Setting up Prebid with the Xandr Publisher Ad Server
This page describes how to set up the Xandr Publisher Ad Server to work with Prebid.js from an Ad Ops perspective.
In some cases there are links to the Xandr Help Center which require a customer login.
Once the Ad Ops setup is complete, developers will need to add code to the page as shown in the example Using Prebid.js with Xandr as your Ad Server.
Xandr Publisher Ad Server Features
Note that the functionality described on this page uses some features that are only available in the Xandr Publisher Ad Server product, such as key-value targeting. For more information, contact your Xandr representative.
Object Limits
Note that using Prebid with Xandr as your ad server may cause you to
hit your Xandr Object Limits.
- Step 1. Add Key-Values
- Step 2. Add Creatives
- Step 3. Set up Line Items
- Step 4. Set up Campaigns
- Step 5. Add the
prebid_enabledCustom Category to Placements - Related Topics
Step 1. Add Key-Values
In the key-value targeting in Console, set up the keys and values shown below. Keep in mind that all of the keys described below should use string values (not numeric).
If you are only sending the winning bid to the ad server, set up your keys like so:
| Key | Value (string) |
|---|---|
hb_pb |
0.1 |
hb_bidder |
"rubicon" |
Otherwise, if you are sending all bids to the ad server, you’ll have to create a key for each bidder (e.g., hb_pb_rubicon, hb_pb_partner1, hb_pb_partner2, etc.), and all of the price bucket values for that key.
| Key | Value (string) |
|---|---|
hb_pb_rubicon |
0.1 |
Depending on the price granularity you want, you may find one of the following CSV files helpful. Each file has the buckets for that granularity level predefined. You can avoid manually setting up key-value targeting by uploading the appropriate CSV file on the key-values screen:
For more information about how to set up price bucket granularity in Prebid.js code, see the API documentation for pbjs.setPriceGranularity.
You can only report on price bucket values if you provide them in the Key-Value Targeting UI.
Step 2. Add Creatives
You’ll need one creative per ad size you’d like to serve. You can re-use a creative across any number of line items and campaigns.
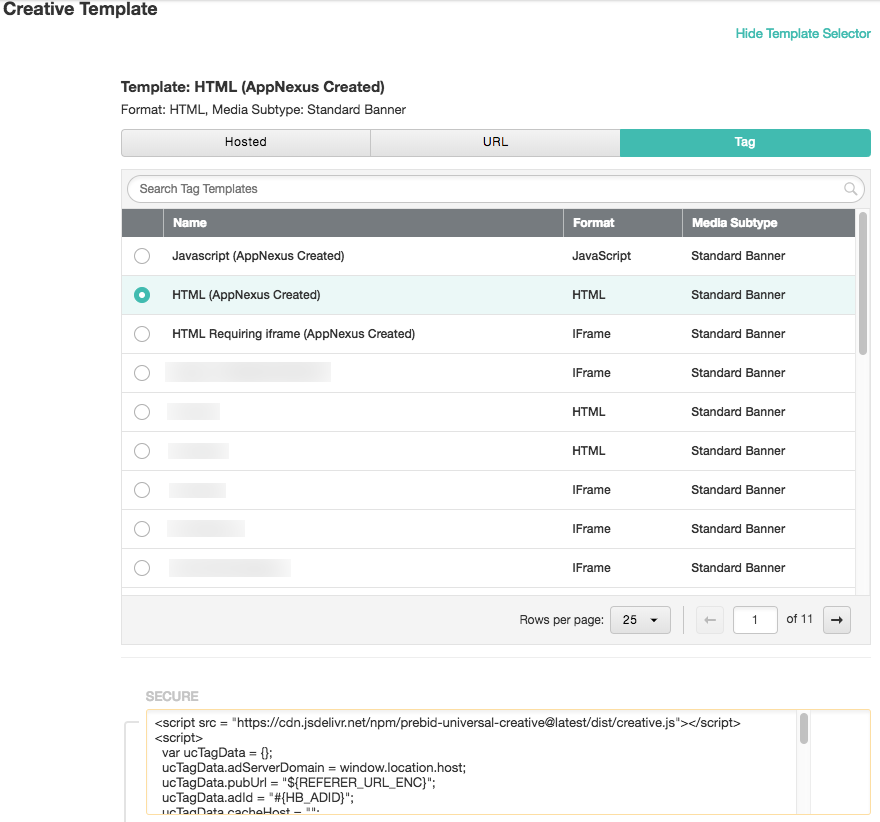
Follow the creative setup instructions in Add Creatives with the following setting:
-
Select Show Template Selector.
-
Select a template with an HTML format.
-
Paste the code snippet shown below into the code box.
 {: .pb-lg-img :}
<script src = "https://cdn.jsdelivr.net/npm/prebid-universal-creative@latest/dist/#{HB_FORMAT}.js"></script>
<script>
  var ucTagData = {};
  ucTagData.adServerDomain = window.location.host;
  ucTagData.pubUrl = "${REFERER_URL_ENC}";
  ucTagData.adId = "#{HB_ADID}";
  ucTagData.cacheHost = "";
  ucTagData.cachePath = "";
  ucTagData.uuid = "";
  ucTagData.mediaType = "#{HB_FORMAT}";
  ucTagData.env = "";
  ucTagData.size = "#{HB_SIZE}";
  ucTagData.hbPb = "#{HB_PB}";
  try {
    ucTag.renderAd(document, ucTagData);
  } catch (e) {
    console.log(e);
  }
</script>
Creative Expiration
Note that creatives are automatically marked as inactive by the Xandr systems after 45 days of inactivity. This may happen to Prebid creatives since they are loaded relatively infrequently compared to other use cases. For help with mitigating this issue, please contact your Xandr representative.
SafeFrame If you want your creative to serve into a SafeFrame, this will need to be enabled on the site-side of the Prebid.js implementation rather than as a setting in the ad server. A developer can learn how to enable this setting for the publisher by referencing Using Prebid.js with Xandr Publisher Ad Server. Additionally if the Xandr ad server tags are configured to use SafeFrames, you will need to use the above creative template to properly render the creative. Earlier versions of the Prebid.js creative template may not be fully SafeFrame compliant (if they are still in-use from older setups), so it is recommended to switch to the above template in this scenario.
Step 3. Set up Line Items
You’ll need to create one line item for every price bucket you intend to serve.
For example, if you want to have $0.10 price granularity, you’ll need 201 line items, one for each of your key-value targeting settings from Step 1.
For each line item, follow the line item setup instructions in Create a Line Item, with the following settings:
-
Set the Revenue Type to CPM.
-
Set the Revenue Value to one of the price bucket key-values from Step 1, e.g., $0.2.
-
Under Associated Creatives, choose to manage creatives at the line item level.
-
Associate as many creative sizes with the line item as you need. Set the Creative Rotation to Even.
-
In your line item’s targeting settings, use the key-value that matches the line item’s price bucket, e.g. (you set these up in Step 1).
-
Still in the targeting settings, target the custom category
prebid_enabled. This will allow you to turn targeting on and off for a placement (or an entire placement group) by adding it to the custom category, which you’ll do in one of the later steps. This is useful for troubleshooting.
For more information about targeting custom content categories, see Content Category Targeting.
Step 4. Set up Campaigns
For each line item, create one campaign to associate with it. The campaign should have an unlimited budget, start running right away, and run indefinitely.
You shouldn’t have to do anything else. All other settings (such as budget and targeting) are inherited from the line item.
For more information, see the full campaign setup instructions at Create a Campaign.
Step 5. Add the prebid_enabled Custom Category to Placements
Make sure the placements you’re using for Prebid are added to the following custom category: prebid_enabled.
This will make sure these placements are targeted by the line items you just set up.
It will also make it easy to turn the targeting on and off for a given placement (or placement group) by adding or removing it from the custom category. This can be very useful when troubleshooting.